Greetings!

Hi all,

So, here's a blog about how to start blogging on your blog... blog blog blog. You know when you say a word too many times and it stops making sense?

Anyway, at its simplest, it's a good place to store powerpoints and lessons notes so students can access them, but you can develop it to be a forum for peer assessment, formative assessment on students' own work and a great portal or hub to start students off on independent study and wider reading.

Until I work out how to get the posts to show in reverse order, use the archive tab below and to the right of this message to search for posts - step 1, 2 and 3 are first. In that order. but you knew that already...


Friday 10 December 2010

Uploading powerpoints and documents

I've got loads of powerpoints on my blog here if you want examples.

If you want students to view slideshows from the lesson, or see a word document (either student work or a work sheet) you have to use another website. It's called slideshare and is at www.slideshare.net

The sign up process is quick and easy, so get through that then click on 'upload'.


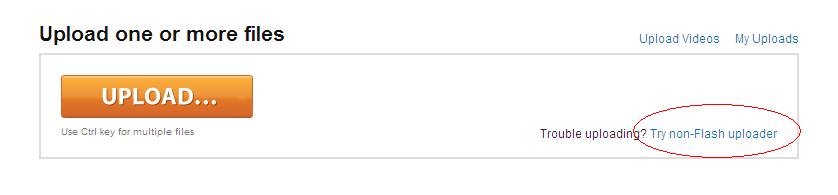
You'll need to use the 'non flash uploader' as the new fangled faffy one doesn't work from school.


Browse your hard drive for the files (it takes pictures, documents, ppts and excel spreadsheets) and click 'open'. You can upload more than one at a time.

When they're uploaded, you'll see a screen like the one below, or click on the 'my uploads' tab if it doesn't show up. Click on the file you wish to show on your blog.


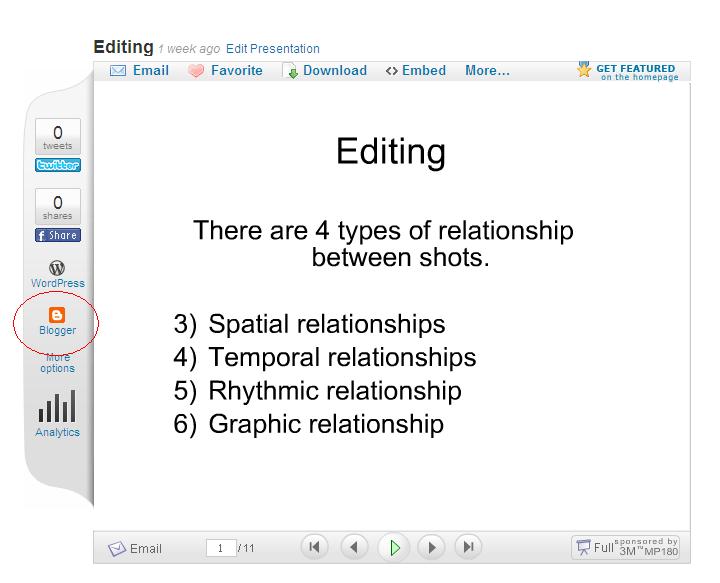
You'll see a screen like this one. Remember BADGER. Click on the blogger logo.


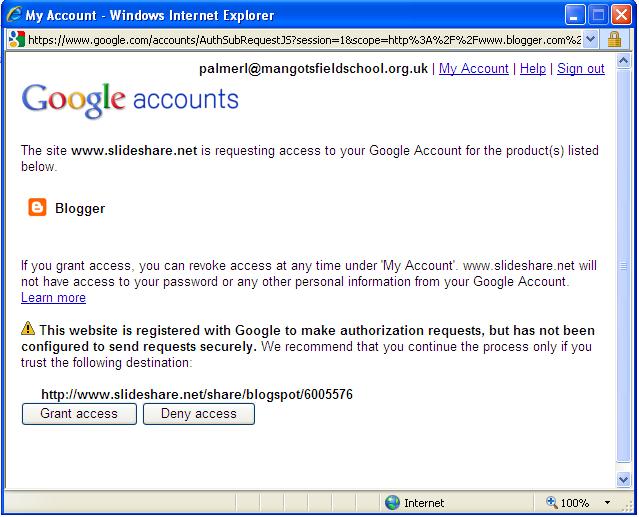
A new window will pop up which will say 'contacting blogger' for a while, then click on 'grant access' at the bottom.


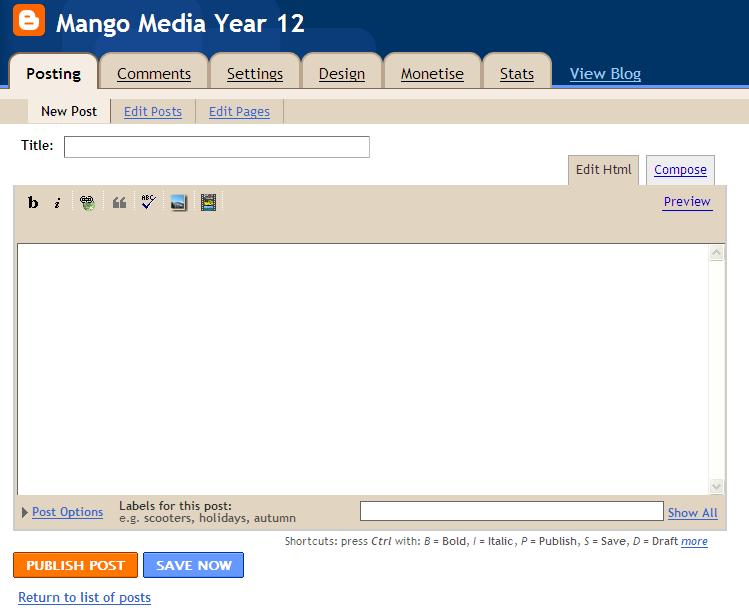
After another short wait, you'll get a window that looks like the new post page on blogger. Fill out the post title, add some text if you want, but make sure you scroll down to the bottom of the screen. You'll find a drop down list with your blog address in it. If you have more than one blog, make sure you're uploading to the right one. Then click Blog this! (how exciting!!)


And you're done - in theory!!

There is another way to do embed things from slideshare too. You can click the 'embed' tag on the BADGER screen (told you to remember BADGER didn't I?!). Simply paste the html text into your own blog post and it should work. You have to have html enabled though - click 'edit html' on the posting screen in blogger (top right) instead of compose.

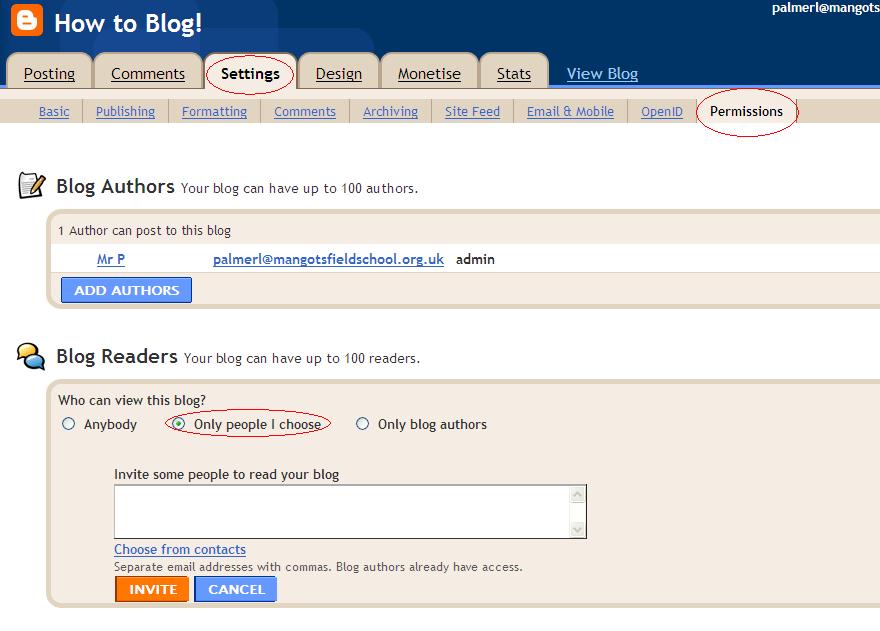
If you've got comments enabled, your students can feed back on worksheets or slide shows. Simple.

Good luck!!

Who can see my blog?

Currently, everyone can see your blog.

If you want to change this so only your students can view it, firstly they will need a google ID - they will have to go through the steps either through google.com (sign in / register is in the top right hand corner) or through the blogger website as per step 1. Students should use school email addresses for this as you have to send them 'invites' to their google-registered address.

Then, it's back into the settings menu, and click on 'permissions', then click 'only people I invite' at the bottom.


Put student's email addresses into the white box and click 'invite'. Students will have to respond before they can view your blog.

Getting comments from students for Peer assessment.

You'll need to reconfigure your 'comments' options so students can make comments about your blog. This is useful for AfL and getting their responses to whatever you're posting about or linking to.

So go back into the settings menu and click on 'comments'.

Scroll down to 'Comment Form Placement' and select the option which says 'pop up window'. This will ensure students can comment.

Step 3 - now what?

So, you've posted something. What next? Well it depends what you want to do really. So I've put up a few posts regarding how you can do different things. Use the 'archive window' to the right of this message - all my blogs are searchable by their title. If anything isn't there, let me know.

Step 2 - design

You'll be sent through a couple of options screens and asked to choose a background. I picked this pretty one with flowers and dandylions because it makes me feel all summery.

When you're done, click the big 'start posting' arrow and you'll see a screen like this one. If you can type in the box, you're off. Click 'preview' if you want to see what your post will look like, and then 'publish post' when you're done.


You may well see a little grey circle in the middle of the writing pane, ghoing around and around. If you do, click on 'settings' in the menu bar at the top.


Scroll down to where it says 'global settings' and change the 'post editor' to 'old version.


Save these settings and you should be able to type now. Again, click 'publish post' when you're done.

Step 1 - signing up.

So, first up you need to sign up. If you already have a google account and are happy using that, you can just sign in. But if not you can enter your school email address and create a password. You may be asked to verify that you're not a robot and have to put in your mobile phone number; a PIN will be texted to you which you then type into the prompt box. This happens about 50% of the time. I've never heard from them since, so there's no SPAM texts attached to doing this, but I do keep hearing from some peson called Kelly.... hmmm!

Sign up here - just click 'sign in' at the top right corner. Or the URL is www.blogger.com

You can actually watch a video of all of this by clicking here. Or keep on scrolling down if you want to.

So, by end of step one you'll see a screen like this.

Just click the big orange arrow.